
Invoice 360 Enterprise - Commercial
Invoice 360 Enterprise is an invoice system that supports cloud syncing and easy self-cloud hosting. The system consists of client apps running on Windows 10 devices that sync data with an Enterprise Cloud Sync Server hosted locally in a Windows Desktop executable. The Enterprise Cloud Sync Server ensures privacy of your business transactions and you save on monthly cloud subscription fee.
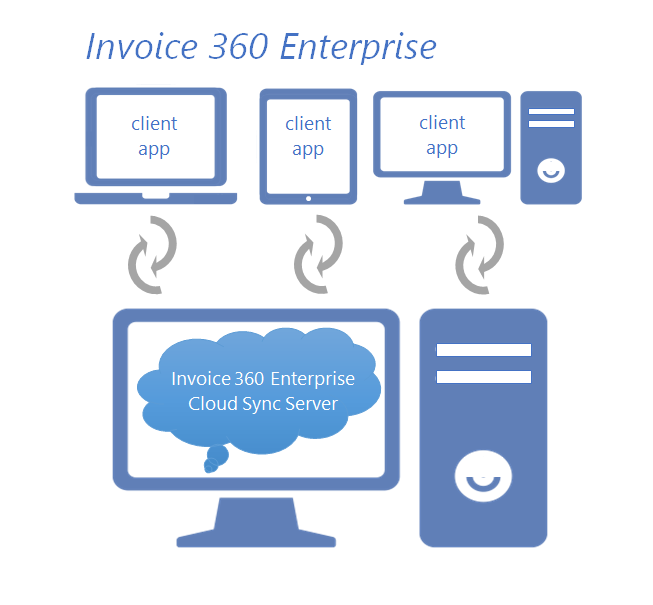
The Invoice 360 Client app, once bootstrapped (data downloaded from server), is available for use even when the Enterprise Cloud Sync Server is unavailable. This provides a system that is resilient to network failures and is great for people on-the-go. For example, a sales person can bring the client app to meet customers, invoice them and then go back to office to sync data with the server.
Download
Invoice 360 Enterprise Cloud Sync Server and Client app
Installation Notes
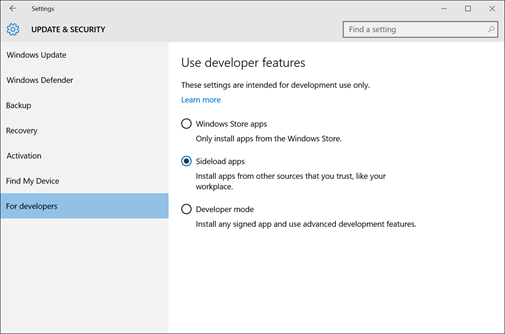
For the client app to be installed successfully, you need to be running on Windows 10 with “Sideloading” enabled. “Sideloading” is a process that allows you to install Universal Windows Platform apps to your PC/device without going through the Windows Store.
To enable "Sideloading", you can go to the Windows search bar (or Cortana Ask Me Anything), enter “For developers” to launch the “Use developer features” settings screen. Next, select the “Sideload apps” option.
Requirements
- Windows 10 (x86 or x64)
- 200 MB Harddisk Space
- 1 GB Memory
- Administrative Rights is required to start the Enterprise Cloud Sync Server
- If the Client app and Server is running on different PCs/devices, a private network or subnet is required.
Purchase Information
- Purchase Registration Key - For a Limited Time only : Apply for a Free Registration Key.
Getting Started with Invoice 360 Enterprise
The steps below illustrate how to start your Enterprise Cloud Sync Server and then use a client app on the same PC/device to connect to the server. The first time the client app connects to the server, it would automatically bootstrap with the data available in the server. To proceed, we assume you have installed the Invoice 360 Client app and Enterprise Cloud Sync Server successfully without any problems.
1. Go to the Start Menu and locate Invoice 360 Enterprise Server.
2. Right Click on the Invoice 360 Enterprise Server and select "Run as Administrator". The Server requires administrator rights to listen to a specific IP address and port.
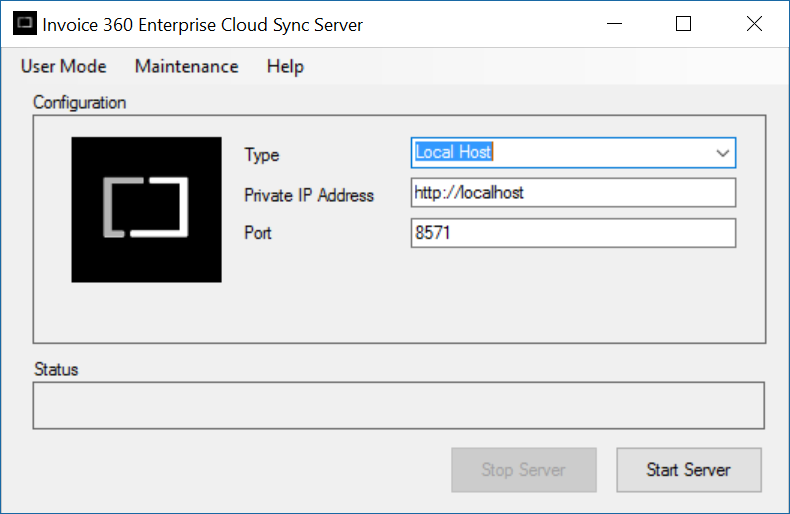
3. Use the default values provided and click on "Start Server". This would start the server on the “localhost” with port “8571”. 4. Go to the Start Menu and click on Invoice 360 Client app. 5. Select "Local" when prompted to connect to the “localhost” server.
You should see the following screen that indicates the client app is ready for use.
You can now setup the company details and other information so that when another new client app connects, they can be bootstrapped with the necessary data. You can also replace the customer or inventory demo records with your own records.
Connecting a Remote Client to Invoice 360 Enterprise Cloud Sync Server
Invoice 360 Enterprise supports a client app running on one PC/device to sync with a Server running on another PC/device. The PCs/devices must be connected to a private network or subnet. The Firewall on the Enterprise Cloud Sync Server PC/device need to be setup to enable TCP connections on a specific port. The tutorial illustrates how to setup the remote client to connect to the Enterprise Cloud Sync Server.
Assumption
- You have completed the “Getting Started with Invoice 360 Enterprise” tutorial.
- You have two or more Windows 10 devices connected via a private network or subnet.
- Your private network is connected to a Windows Homegroup, Workgroup or Domain. You can check out question 4 of our FAQ on how to setup a Windows Homegroup or Workgroup.
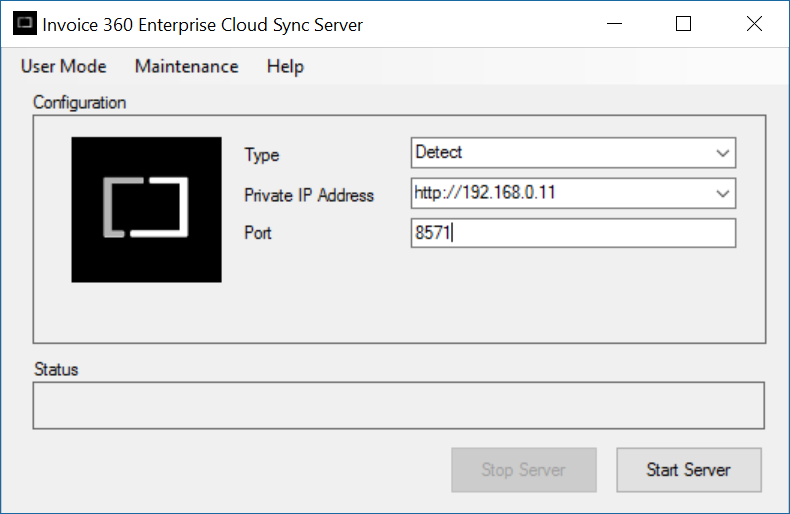
1. On the PC/device that you have installed the Invoice 360 Enterprise Cloud Sync Server, Right Click on the Invoice 360 Enterprise Server and select "Run as Administrator".
2. Select "Detect" in "Type". Invoice 360 Enterprise Cloud Sync Server will automatically detect your private IP addresses. Select your IP Address and then click on "Start Server". Note that we have selected to start the Server on a IP address instead of the “localhost” in the “Getting Started with Invoice 360 Enterprise” tutorial. This allows client apps running on other PCs/devices to connect to this server with the specified IP address and port number.
Start the Invoice 360 Client app
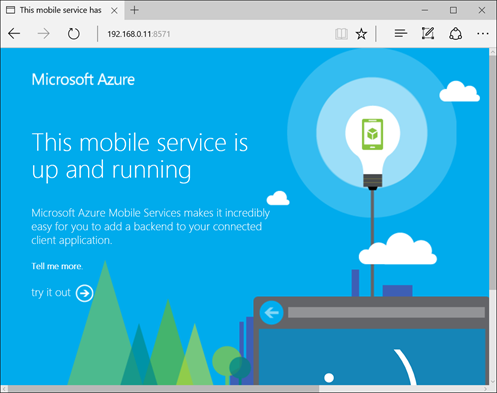
1. Before setting up the client app, we would like to test that your previous steps were carried out successfully. On the device that you intend to run the remote Invoice 360 Client app, launch Microsoft Edge. Enter the IP address and port number of your Enterprise Cloud Sync server in the format below:
“http://
e.g. in our previous section, our IP address is “192.168.0.11” with a port number “8571”.
“http://192.168.0.11:8571”
Please ensure that you see the following screen. If not, please check that your Enterprise Cloud Sync Server is running.
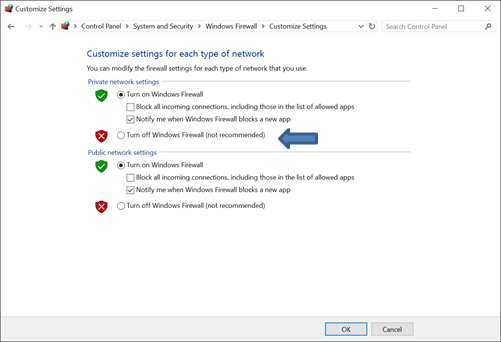
If you cannot see the screen above, the Windows Firewall running on the PC/device with the Enterprise Cloud Sync Server may be blocking the connection. You can turn off the firewall temporarily to test out whether this is the case.
On the PC/device running your Enterprise Cloud Sync Server, launch “Windows Firewall” from the search bar (or Cortana Ask Me Anything) and click on “Turn Windows Firewall on or off”. In the “Private network settings”, select “Turn off Windows Firewall”. Please make sure that you are turning off the Firewall for your private network only. You can use Microsoft Edge to connect to the Server again after turning off the firewall.
2. Now that you have confirmed the Enterprise Cloud Sync Server is available, you can launch the Invoice 360 Enterprise installer on the device you intend to run the client app. Select to install the Invoice 360 Client as shown below.
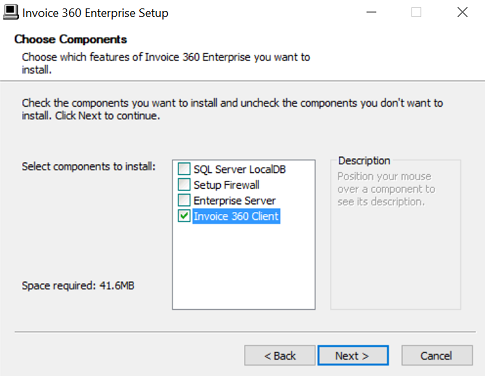
3. Click on the “Next” button, choose the install location and then click on the Install button. Select “Yes” when prompted to setup the Invoice 360 Client app on your system automatically.
4. Launch the Invoice 360 Client app. When prompted to bootstrap from a local server or remote server, select “Remote”.
5. Enter the URL of your Enterprise Cloud Sync Server. This is the private IP address of the server followed by the port number. The URL is also displayed on your Enterprise Cloud Sync Server when it is started. For example, http://192.168.0.11:8571 or something similar. Click on the “Proceed” button and the client will bootstrap itself with the server.
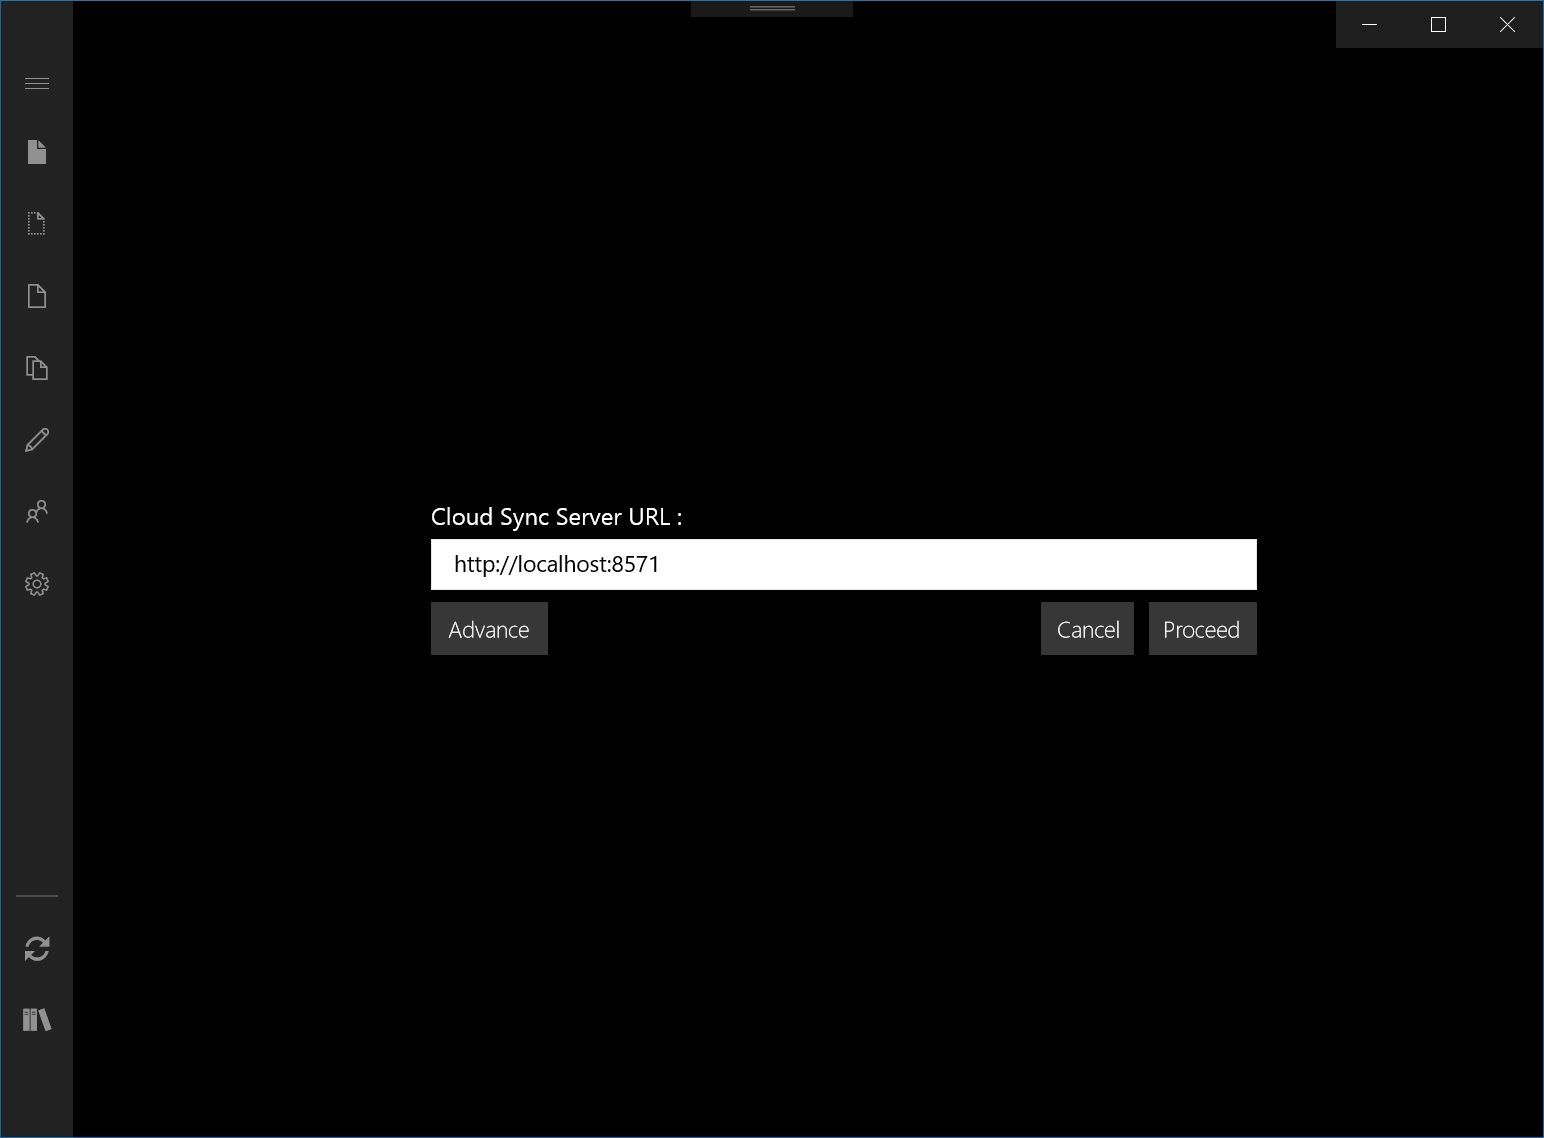
If you see the following screen, you are ready to start using the Invoice 360 Client app.
You have now successfully bootstrap an Invoice 360 Client app on a remote PC/device. You can use this PC/device to invoice your customer. If the Enterprise Cloud Sync Server is available, your changes to your app will be automatically sync with the server. If you are not connected to your private network or if your server is not available, the app will continue to work but the changes will not be saved to the server. You can also tap on the Sync button in the app bar (right click on the screen) to manually trigger the syncing process.
Note
Please remember to turn on the firewall if you have turn it off previously. The next section illustrates how to enable inbound connections to the Enterprise Cloud Sync Server properly by adding a firewall policy.
Enable inbound connections in Firewall on the PC/device running Enterprise Cloud Sync Server
This section illustrates how to enable inbound connections on the PC/device running your Enterprise Cloud Sync Server via “Windows Firewall”, a firewall application bundled with Microsoft Windows. If you are using other firewall applications, the steps should be similar in concept. In general, we want to allow inbound connections on port 8571, the default port used by Invoice 360 Enterprise Cloud Sync Server.
1. Launch “Windows Firewall” from the search bar (or Cortana Ask Me Anything) in Windows.
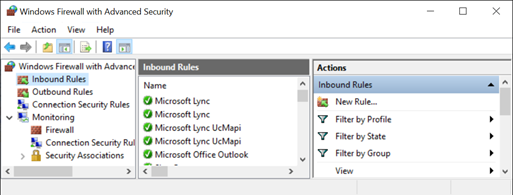
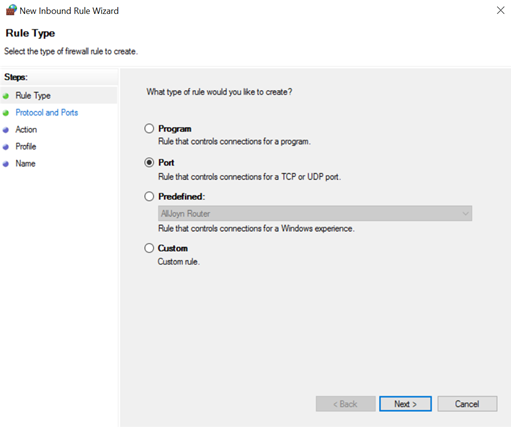
2. Right click on “Inbound Rules” and select “New Rule”. In the screen as shown below, select the option “Port”. We need to allow TCP connections through the Firewall on a specific port.
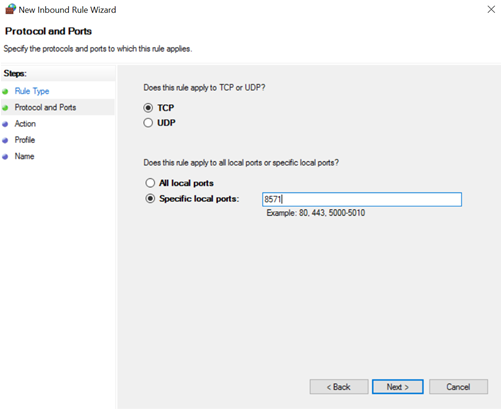
3. Select the rule to apply to “TCP”, select “Specific local ports” and enter “8571”. If you want to use other ports for your Invoice 360 Enterprise Cloud Sync Server, you can specify other port number.
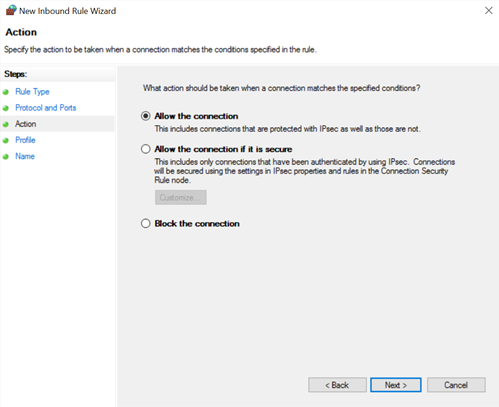
4. Select the “Allow the connection” option and click on the “Next” button.
5. Select the “Domain” and “Private” options and uncheck the “Public” option. It is important to uncheck the “Public” option to ensure that no one outside your private network have access to the Invoice 360 Enterprise Cloud Sync Server.
6. Finally, save the rule as ”Invoice 360 – 8571” or any other names that you can easily remember. In the previous steps, we have enabled inbound connections to this PC/device via port 8571 from PCs/devices in your private network.
Using Invoice 360 Client app
The Invoice 360 Client app is very similar to the one available in the Windows Store today. The user interface has evolved through many iterations with many changes made based on recommendations by users who use it daily. This section provides you with a quick overview of using the client app.
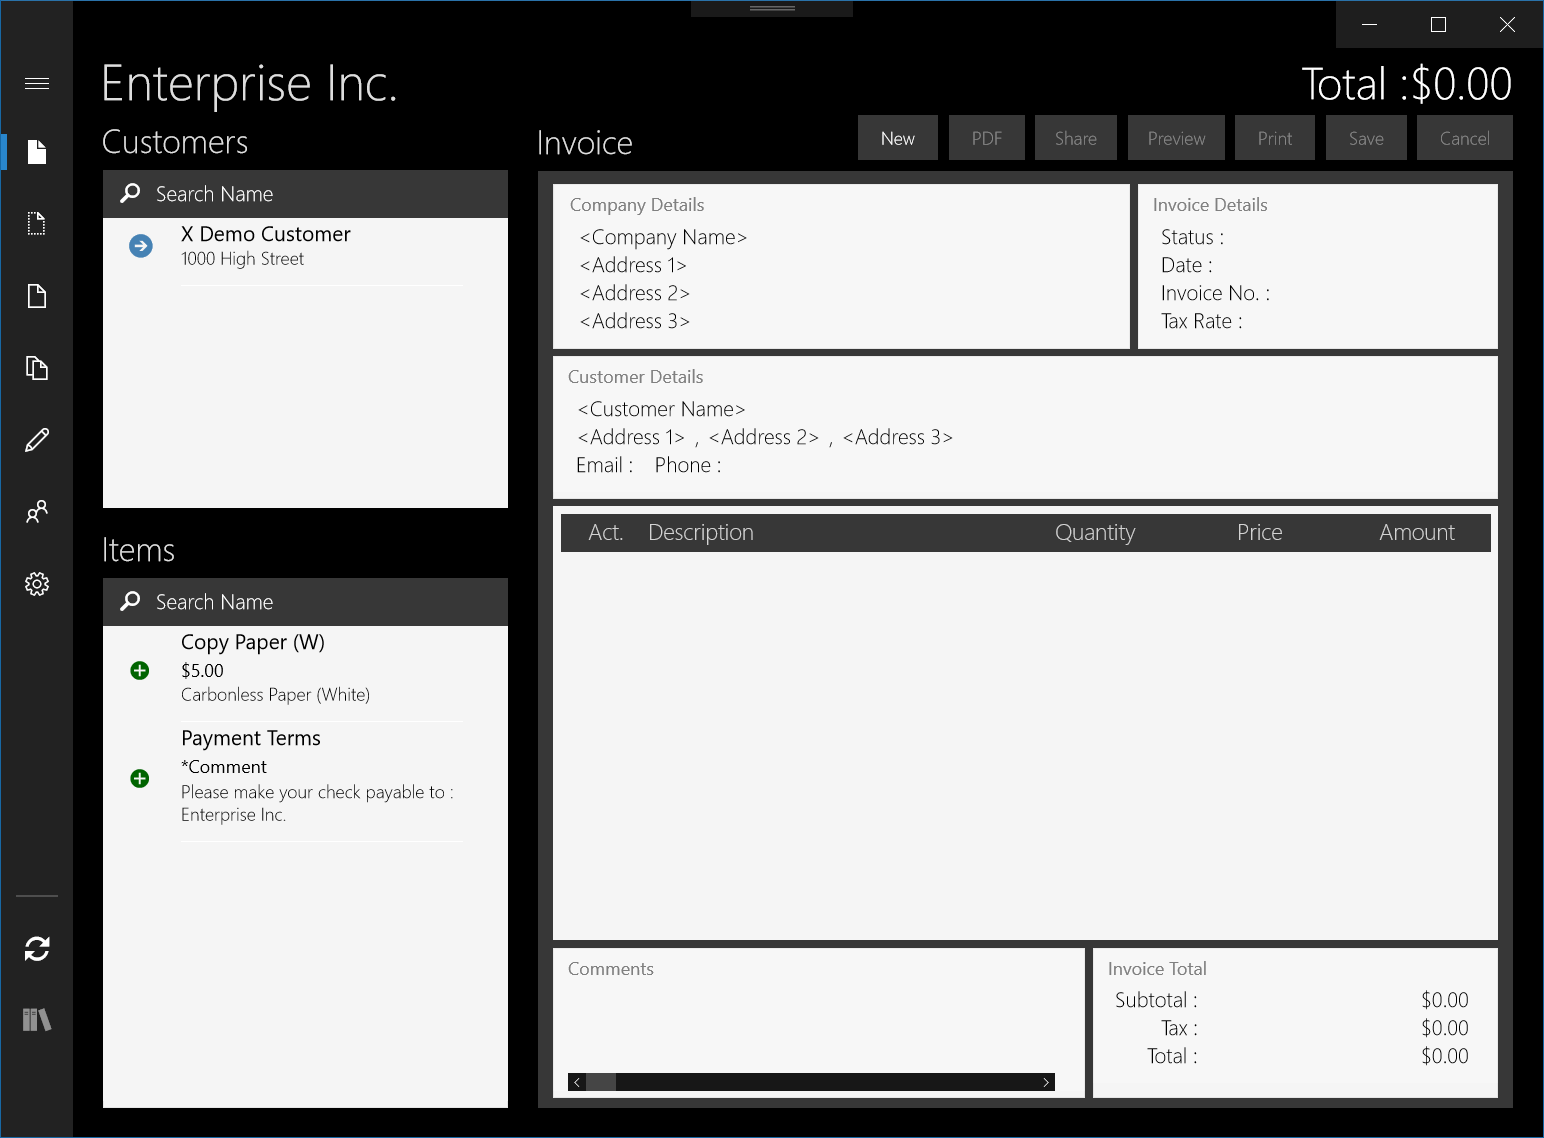
The Invoice screen as shown above is the landing screen in Invoice 360 Client app. The left-hand side of the screen allows you to select the customer to invoice and the items such as products or services that can be added to the invoice. The right-hand side of the screen is layout to look like a physical invoice with Company Details, Invoice Details, Customer Details, Items in the invoice, Comments, and Invoice Total. The client app consists of other screens which you can access through the Ellipsis button (or Right Click with your mouse) on the bottom right hand corner of the app.
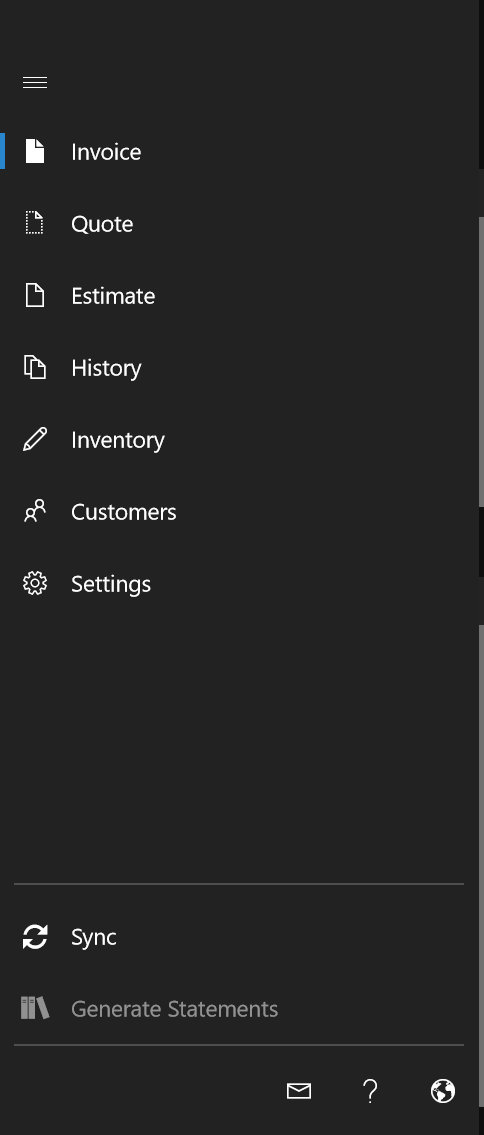
Each of the different screens enables you to manage a different aspect of the invoice process.
- Invoice
- Quote (needs to be turned on in Settings)
- Estimate (needs to be turned on in Settings)
- History
- Customer
- Inventory
- Settings
You can create a new invoice by simply selecting a customer in the “Customers” section and then adding items from the “Items” section. Notice that each time you tap on the items on the left-hand side, it is added to the invoice on the right-hand side.
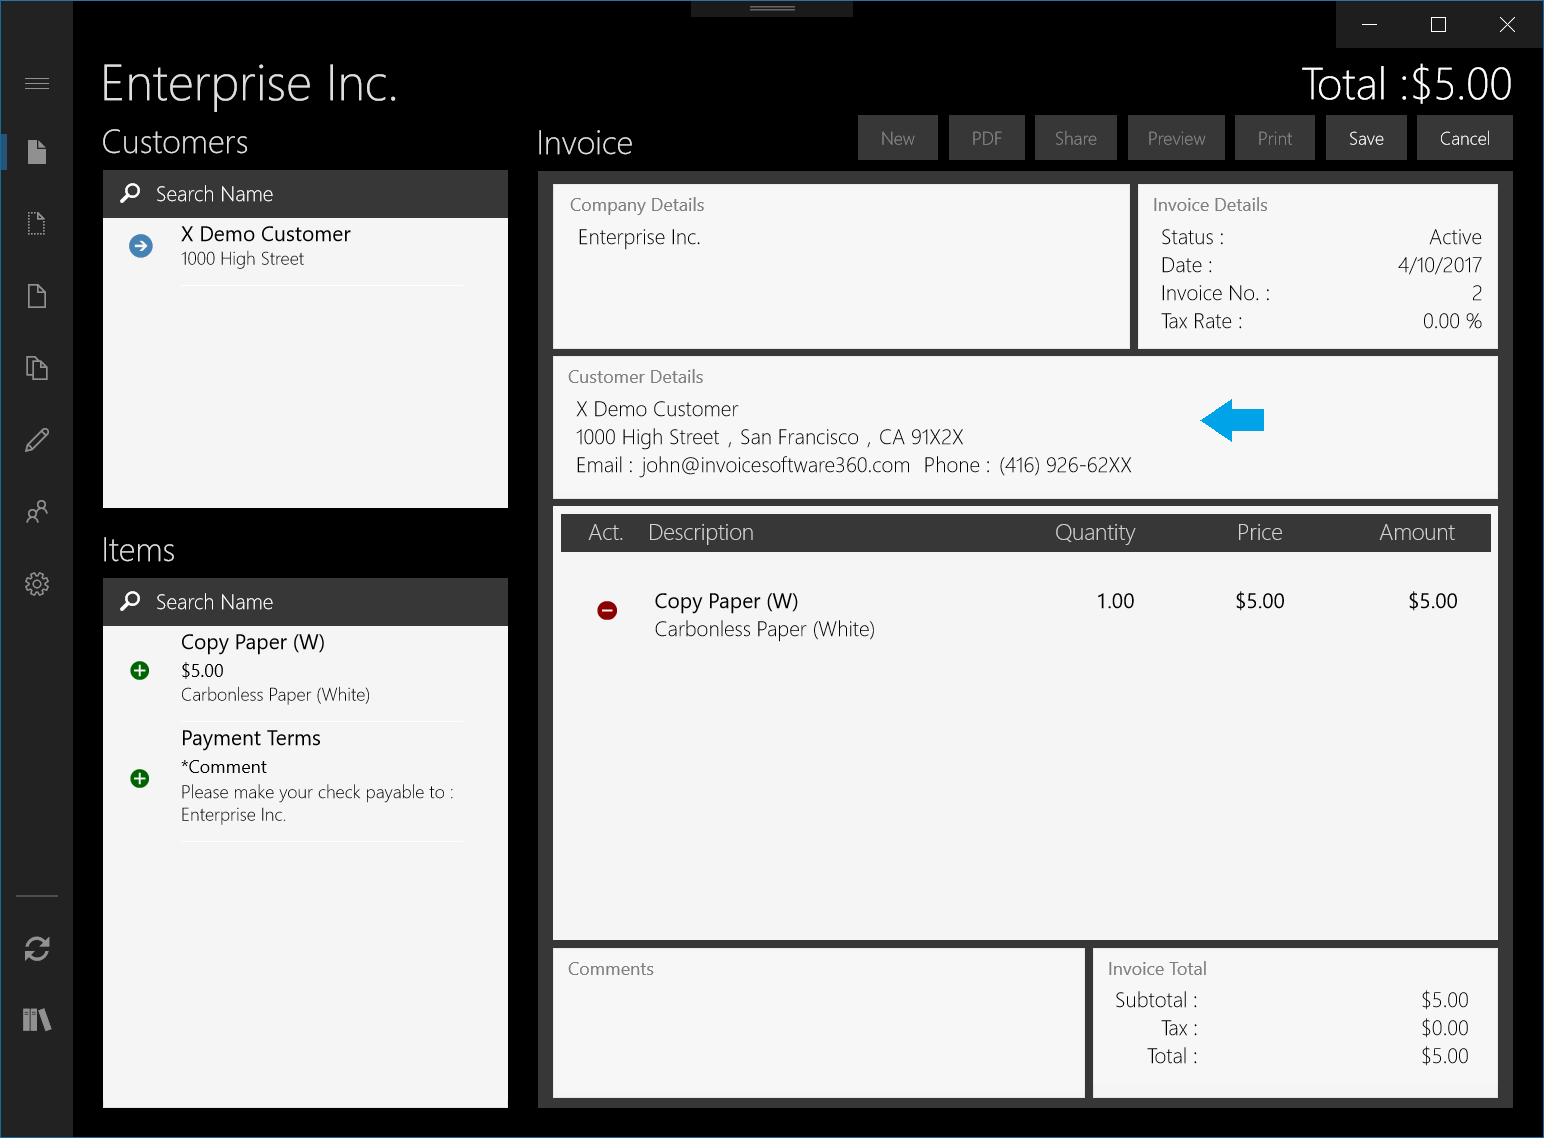
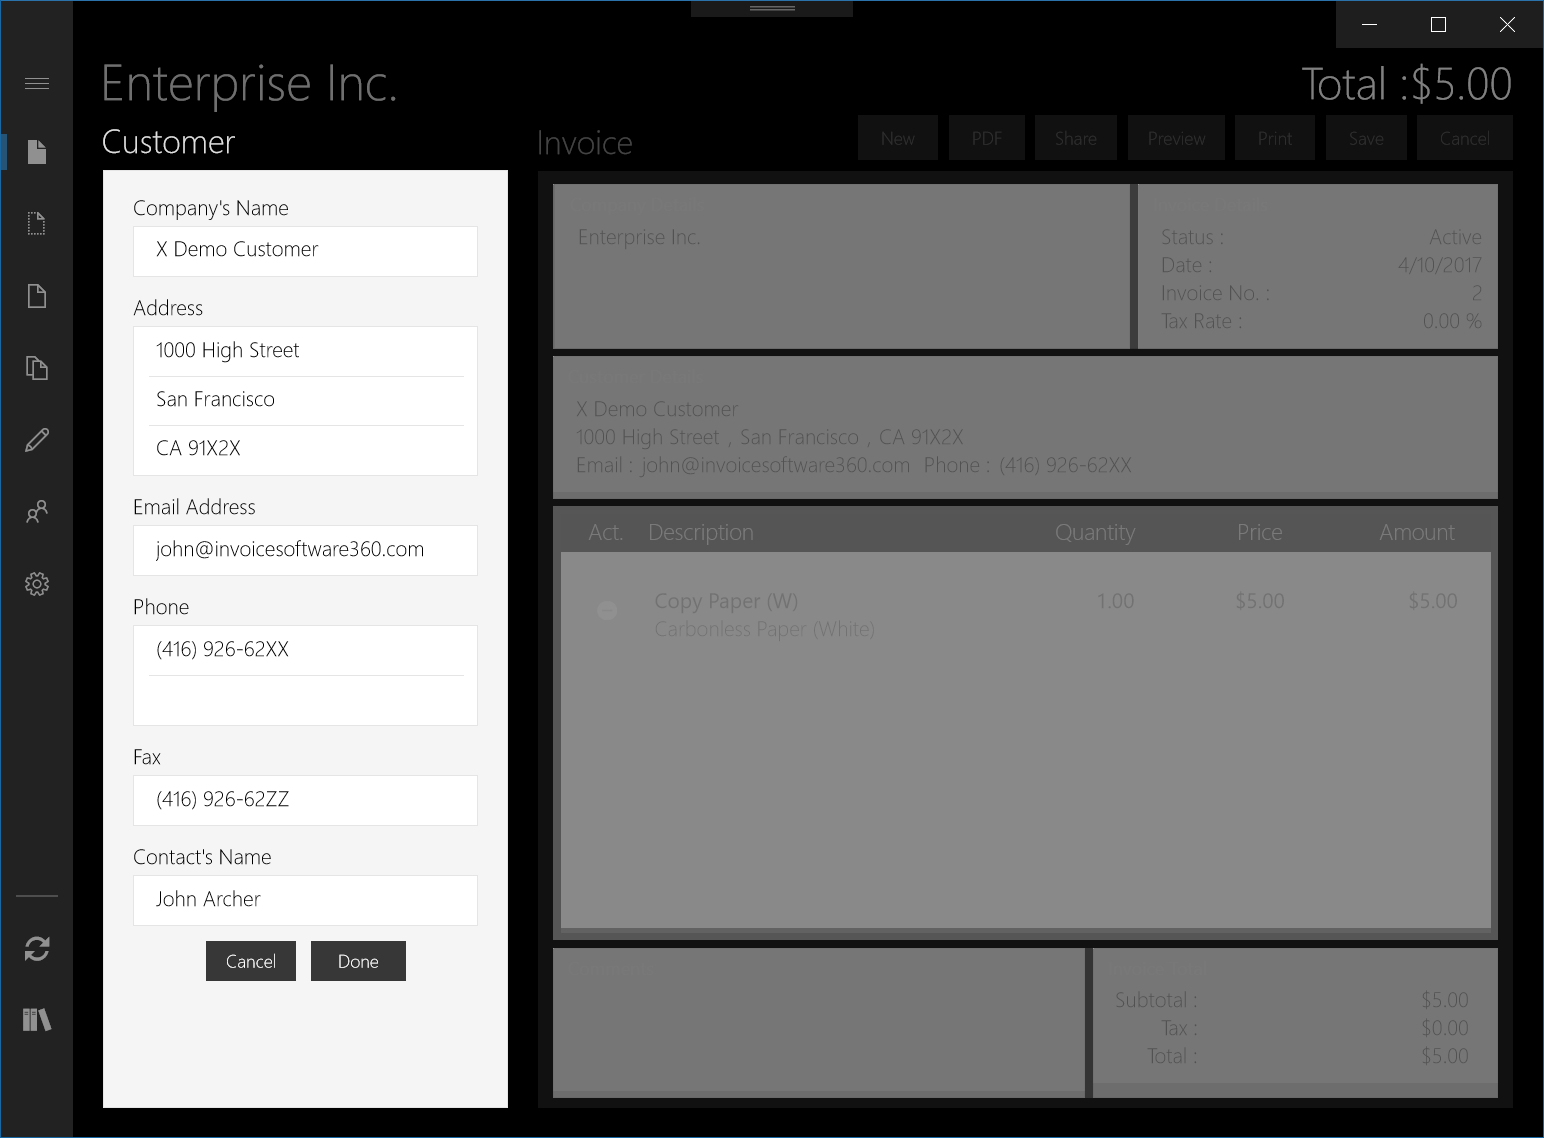
You can further customize the details of your invoice by clicking on any part of the invoice on the app. For example, clicking on the area specified by the blue arrow above allows you to make changes to the details of the customer. This is as shown in the next screen.
You can also go to the other screens such as Customers or Inventory to add new customers and items. The customers and items will then appear in the Invoice screen for selection. More information on using the Invoice 360 Client app is also available at the following:
https://invoicesoftware360.com/invoicesoftware.html
You can also design a custom invoice template with our Free Invoice Template designer:
https://invoicesoftware360.com/invoicedesigner.html
Frequently Asked Questions
Frequently Asked Questions
1. What can I do if I am unable to start my server?
2. I cannot find my Invoice 360 Client app in the Windows Start Menu.
3. After setting up the Windows Firewall rule to allow inbound TCP connections on port “8571”, I still can’t connect my client to the server.
4. I am using a WiFi/MiFi device to connect to the internet for my PCs/devices at home. Despite setting up the Windows Firewall rule to allow inbound connections on port “8571” (or turning off the Firewall), I am still unable connect my client to the server.
5. I see multiple IP address when I use the “Detect” option in Invoice 360 Enterprise Cloud Sync Server. Which one should I use?
6. How do I check that all components have been installed successfully by the installer?
7. How do I backup or initialize my Enterprise Cloud Sync Server data?
8. How can I start the Enterprise Cloud Sync server such that both the client on the “localhost” and remote clients can access it?
9. How do I know whether I have successfully synced with the Invoice 360 Enterprise Cloud Sync Server?
10. How can I import my data into Excel for analysis and reporting purposes?
11. What does BYOC means and why is it important?
Recommendations
1. What can I do if I am unable to start my server?
You should be able to start the server on localhost without Administrator rights. However, to start it on a specific IP address, you will need to make sure you are running the Server as an Administrator. Before starting the server, remember to Right Click on the Invoice 360 Enterprise Server and select "Run as Administrator".
2. I cannot find my Invoice 360 Client app in the Windows Start Menu.
Invoice 360 Client app is developed based on the Universal Windows Platform (UWP). The client app is not listed on Windows Store publicly but package as part of the Invoice 360 Enterprise installer. For the client app to be installed successfully, you need to be running on Windows 10 with “Sideloading” enabled.
Enable “Sideloading”
In the search bar (or Cortana Ask Me Anything) in Windows, enter “For developers” to launch the “Use developer features” settings screen. Next, select the “Sideload apps” option. “Sideloading” is a process that allows you to install Universal Windows Platform apps to your PC/device without going through the Windows Store.
Reinstall Invoice 360 Client app
After enabling “Sideloading”, you can launch the Invoice 360 Enterprise installer to reinstall the Invoice 360 Client app. During installation, you will be prompted whether to setup the Invoice 360 Client on Windows automatically. Remember to select “Yes” and the client app should appear in your Start Menu.
3. After setting up the Windows Firewall rule to allow inbound TCP connections on port “8571”, I can’t connect my client to the server. When I use Microsoft Edge to test the connection to the server, I am getting the following:

Turn off the Windows Firewall for your Private network temporarily
To see if the problem is caused by the Windows Firewall, you can turn off firewall temporarily on your private network.
On the PC/device running your Enterprise Cloud Sync Server, launch “Windows Firewall” from the search bar (or Cortana Ask Me Anything) and click on “Turn Windows Firewall on or off”. In the “Private network settings”, select “Turn off Windows Firewall”. Please make sure that you are turning off the Firewall for your private network only.
Now go to the device running the Invoice 360 Client app, launch Microsoft Edge and enter the IP address and port number (e.g. http://192.168.0.11:8571) again. If you see the following screen, it means that the Firewall is indeed the cause of the issue and that you have setup the Firewall inbound rule incorrectly.
Please remember to turn on the Firewall after correcting the setup of the inbound rules as described in the previous tutorial.
4. I am using a WiFi/MiFi device to connect to the internet for my PCs/devices at home. Despite setting up the Windows Firewall rule to allow inbound connections on port “8571” (or turning off the Firewall), I am still unable connect my client to the server.
For some users, creating a Windows Homegroup (if you do not have one) resolved the issue. A Homegroup is a Windows concept that enables you to share things such as pictures, music and photos.
Creating a Homegroup on one PC/device
a. First, make sure you are connected to your home WiFi/MiFi and not the wireless internet provided in the public. Launch “Control Panel” and select ”Network and Internet” followed by ”Homegroup”. In the Homegroup window, click the “Change Network Location” link.

b. You may be prompted with the “Do you want to allow your PC to be discoverable by other PCs and devices on this network?” message. Simply click “Yes” to proceed. Otherwise, proceed to the next step.
c. Next, click on “Create a Homegroup” button. If you see the "Join Now" button, someone on your network has already created a Homegroup and you simply need to join it (see the next section). d. Next, select the libraries or folders that you would like to share. You can use the default values provided.
e. Finally, you would be shown the password for the Homegroup. Take note of the password as you will need it for your other devices joining this Homegroup.
Joining a Homegroup on another PC/device
First, make sure you are connected to your home WiFi/MiFi and not the wireless internet provided for the public.
a. Launch “Control Panel” and select ”Network and Internet” followed by ”Homegroup”. In the Homegroup window, click the “Change Network Location” link.
b. You may be prompted whether to allow your PC to be discoverable by other PCs. Simply click on the “Yes” button. Otherwise, proceed to the next step.
c. Next, click on the "Join Now" button and select the libraries or folders that you would like to share. You can use the default values provided.
d. Finally, enter the Homegroup password when you create a Homegroup.
In Windows File Explorer, you should be able to see a node for Homegroup on the left-hand pane. You should also be able to see the different PCs/devices in the Homegroup. You can now try to connect to the Enterprise Cloud Sync Server from Microsoft Edge again. Please remember to setup the Firewall rule to enable inbound TCP connections on the Enterprise Cloud Sync Server PC/device correctly.
5. I see multiple IP address when I use the “Detect” option in Invoice 360 Enterprise Cloud Sync Server. Which one should I use?
It is possible to have multiple private IP Addresses for various reasons. In this case, we recommend checking with your IT Administrator on which IP address to use. Alternatively, you can test out each of the IP addresses to see which one you are able to connect to from Microsoft Edge.
6. How do I check that all components have been installed successfully by the installer?
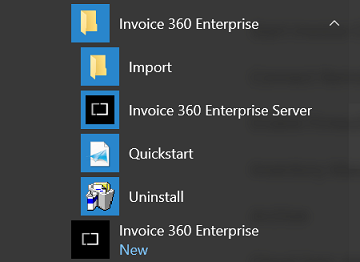
You can go to the Start menu and check your installed components. “Invoice 360 Enterprise” is the client app. “Invoice 360 Enterprise Server” is the self-hosted server.
Go to Control Panel->Program->Program Features and check that “Microsoft SQL Server 2012 Express LocalDB” is available. This is the database component of Invoice 360 Enterprise Cloud Sync Server.
7. How do I backup or initialize my Enterprise Cloud Sync Server data?
Invoice 360 Enterprise Cloud Sync Server stores your data as Microsoft SQL Server data files in the folder “%PROGRAMDATA%\invoice365”. You can use Windows File Explorer and go to the above folder to make a backup of the data files.
- invoice365Database.mdf
- invoice365Database_log.ldf
If you have created a lot of demo data for testing, you can use the “Reset” function in the “Settings” screen to clear the entire server database. This will enable you to start the database from fresh without removing the records individually.
8. How can I start the Enterprise Cloud Sync server such that both the client on the “localhost” and remote clients can access it?
Go to the Windows Start menu, right click on the Invoice 360 Enterprise Server and select "Run as Administrator". Select “All” as the “Type” and then start the server. This will start the server that accepts connections from both local and remote client apps.
9. How do I know whether I have successfully synced with the Invoice 360 Enterprise Cloud Sync Server?
Every time you made a change to the invoice or to any other records, it would be saved to your app local database. The changes would also be automatically pushed to the server. If a network connection is not available, the “push” operations will be cached locally until a connection is available.
The app does not specifically prompt you when a “push” to the server has failed. This is to ensure seamless use of the app. It does, however, keep track of the number of outstanding operations to be synced with the server. You can check the number of outstanding operations in the app bar “Sync” button. Simply right click with your mouse or click on the Ellipsis button to check the number in brackets. For example, if you see “Sync (10)”, it means you have 10 outstanding operations to be synced with the server.
A two-way sync is triggered when you click on the “Sync” button. This means besides pushing data to the server, the data that is updated by other devices to the server is also downloaded to your device.
10. How can I export my data into Excel for analysis and reporting purposes?
You can launch Invoice 360 Client app, go to “Settings” screen and tap on the “Export” button in the app bar. This will export the data into “.csv” files which you can easily open in Microsoft Excel. We recommend that you perform a Sync to ensure that you have all the latest data from the server before you perform the export.
11. What does BYOC means and why is it important?
Invoice 360 Enterprise is developed based on the “Bring Your Own Cloud” (BYOC) vision. Basically this allows you or your company to have the flexibility to run the Cloud Sync Server on a public cloud hosted by us, on your own cloud (with Microsoft Azure), or on a self-hosted cloud in a Windows Desktop Executable.